Biology
The perfect body – Childbirth
Images

3d model information
Technology:
FDM
Material:
PLA
Sizes:
HEAD: circumference: 350mm PELVIS: inner circumference: 350mm
Accuracy:
Low
Resistance:
Medium
Printing time:
1d
Number of pieces:
2
STL Files Viewer
Summary
This project is about creating a more efficient human body. The students will think about how they can improve different parts of our body, in this case pelvis, in order to make easier childbirth. Students will then need to scale the idea to put it in a woman torso. It would be 3D-printed in an appropriate size.
Learning objectives
After completing this project, students will be able to:
- Calculate and apply scales
- Comprehend the differences between male and female anatomy
- Analyse the disadvantages of our human body
- Relate the form of female pelvis with reproduction and birth
- Understand the significance of the size and position of the fetal head during birth
- Identify the maternal anatomic and physiologic adaptations to labour
- Use 3D printing file
- Learn 3D printing techniques
Teacher preparation
- The teacher will prepare the digital presentation to introduce the project to the students.
- Students must know previously the basics of scales and human anatomy and physiology.
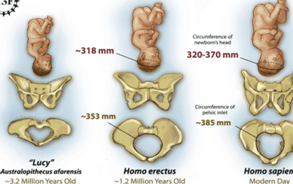
- The skull of a newborn must fit through the female pelvis at birth – it has to be as big as the diameter of the birth canal.
- But maternal pelvic dimension are constrained by aspects of bipedal bio-mechanics, unlike in the great apes, whose pelvic dimensions are larger than neonatal head size (figure 1).
- The teacher will print some basic parts before the class (figure 2).
Teacher explanation
- Explain the topic and objectives of the project.
- Show 3d printed anatomic models of:
- Different kinds of pelvis
- Baby head
- Normal women torso
- Discuss size related to scale/proportion.
- Split up the students into 4 groups, one for each type of pelvis (figure 3).
- Explain 3D printers functioning and 3D design guide.
- Explain how to save the files and how to export to the suitable format (STL).
- Explain how to prepare the 3D printer for launching jobs.
Student activity/Steps
The steps to follow are:
- Understand the characteristic of the type of pelvis given (gynecoid, android, anthropoid, platypoid)
- Calculate how big this pelvis must be to make easier birth.
- Scale and widen the normal torso.
- Draw/Create/Adapt the model using Tinkercad– export to Flash Forge Finder.
- 3D print the torso.
- Compare with the normal one.
- Draw a conclusion.
General Info
Age of students
15-16
Skills needed
3D printing, computer design
Duration
2 lessons (55 minutes)
Individual/Groups
Group
Materials
Tools
Computer, modelling programme, 3D printing programme
Software
License Info
License name:
Attribution 4.0 International (CC BY 4.0)
License details:
You are free to: Share — copy and redistribute the material in any medium or format. Adapt — remix, transform, and build upon the material for any purpose, even commercially. Under the following terms: Attribution — You must give appropriate credit, provide a link to the license, and indicate if changes were made. You may do so in any reasonable manner, but not in any way that suggests the licensor endorses you or your use. No additional restrictions — You may not apply legal terms or technological measures that legally restrict others from doing anything the license permits.
More info:
I printed it
If you printed this exercise you can register and share it with the community:
Create a new accountOr Login if you are registered.

