
Technology (STEM)
Individual buttons for Model Games Controller
Images
3d model information
Technology:
FDM
Material:
PLA
Sizes:
Various depending on chosen design however each handle must fit into a pre-drilled 5.5 mm
Accuracy:
Resistance:
Printing time:
1 Hour per student
Number of pieces:
Various per student
STL Files Viewer
Summary
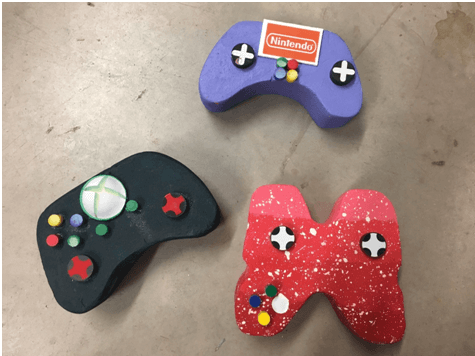
During this project, students have been researching into Games Controllers, Students would have created a Mood Board of existing products and analysed them. Students would have discussed where they could find relevant information. Students would have researched into Ergonomics and how it plays a part in the designing of a Games Controller. This is a group based activity where students work as part of a group to design their individual controllers.
Learning objectives
Students will be able to:
- Understand Tinkercad
- Learn 3D printing techniques
- Create and print in 3D STL model of their chosen button designs
- Complete making of Models Games Controller
- Understand the importance of considering Ergonomics/Scale/Proportion when creating a product
Teacher preparation
Ensure all students have their Model Games Controllers complete to the point where they are ready to add their designed buttons.
Teacher explanation
Re-cap the unit of work which has been covered – the making of the Model Games Controller. Discuss with students the finishing touch of the controller – their individual buttons. Discuss with students the importance of carrying out research before sketching ideas. Discuss with students the overall size and placement of the buttons – Ergonomics/Scale/Proportion. Discuss Ergonomics in relation to the shape/size/placement of the buttons they will design.
Student activity/Steps
Step 1: Students to research different types of button shapes – create a mood board from found images on the internet.
Step 2: Students sketch out the type of buttons they would like to add to their individual products – add annotations and decide which design (shape/s) would look best on their products
Step 3: Student to draw on Tinkercad their chosen idea(s)
Step 5: More able students might consider the texture of their button and adapt their drawing so that the buttons are shaped and more ergonomic and not just have a flat surface.
Step 6: Students to export their final design to Flash Forge Finder
Step 7: Students scale their drawing to allow the buttons to fit onto the controller. (The controller would have been cut from a piece of foam measuring 150mm x 200mm
Step 8: Students to print their buttons in their chosen colour to match/compliment their Model Games Controllers
Step 9: Student to attach their buttons with a hot glue gun and photograph their product.
Step 10. Students to complete the write up in their Production Logs on the processes they have just carried out.
General Info
Age of students
12-13 (KS4)
Skills needed
Computer design, 3D printing
Duration
3-4 lessons (50 minutes)
Individual/Groups
Individual
Materials
PLA Prior to the lesson foam, paint, vinyl stickers, filler
Tools
Spatula, pliers, glue, hot glue gun Prior to lesson – coping saw, belt sander, file, paint brush
Software
Tinkercad, Flash Forge Finder
License Info
License name:
Attribution 4.0 International (CC BY 4.0)
License details:
You are free to: Share — copy and redistribute the material in any medium or format. Adapt — remix, transform, and build upon the material for any purpose, even commercially. Under the following terms: Attribution — You must give appropriate credit, provide a link to the license, and indicate if changes were made. You may do so in any reasonable manner, but not in any way that suggests the licensor endorses you or your use. No additional restrictions — You may not apply legal terms or technological measures that legally restrict others from doing anything the license permits.
More info:
I printed it
If you printed this exercise you can register and share it with the community:
Create a new accountOr Login if you are registered.